
Working with Activities
In SalesTrack, you can use activities to keep track of all your customer communications. Record all important conversations with the customer or the communication with your team members regarding a record in SalesTrack. Add a phone call, task, notes, email, or appointments right within the case, account, contact, lead, or opportunity records without navigating to a different area and opening another form.
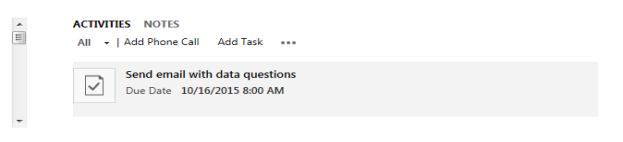
All activities that you add from within a record appear in the Activities area. If the Regarding field of an activity is set, the activity appears in the activity wall of the regarding record. You can filter the list to show just the activities that are in progress or the ones that are overdue. Click the inline Complete link to close the activity as Completed.
SalesTrack automatically timestamps every activity and shows the user who created it. You and other people on your team can scroll through the activities to see the history as you work with a customer.
To get the most out of SalesTrack, it's important for everyone in the organization to track all their customer interactions by adding an activity for every email, phone call, task, or appointment. That way, a customer's history is complete.
Activities can be included in reports to track your ongoing progress and monitor how the service team is doing at meeting service level agreements.
You can access or create Activities many ways, from the navigation bar, from within a record (such as an account or contact), using the Quick Create option or from the Dashboard.
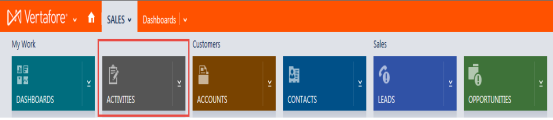
- From the top navigation bar - On the top navigation bar click Sales and select the Activities tile.
- From within a record such as a Account, Contact, Lead, Opportunity – When you open an Account, Contact, Lead or Opportunity the dashboard includes the Activities section.
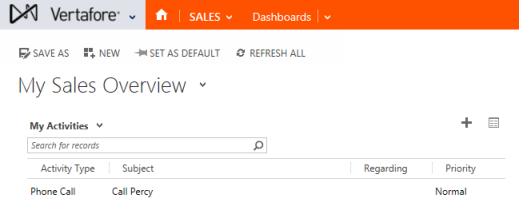
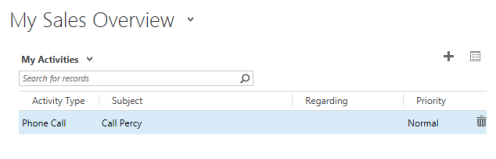
- From the My Activities section on the dashboard click +.
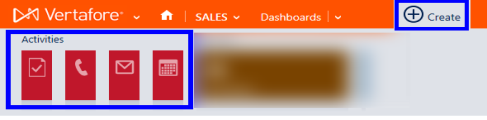
- From the Quick Create option click + Create and select the type of Activity.
- Access an activity from a record, or the dashboard.
- Double-click to open the activity.
- Make the appropriate changes. The changes are Auto Saved every 20 seconds by SalesTrack.
Just as we can access an activity in multiple locations, they can also be deleted by multiple locations. You can delete an activity:
Delete from the Dashboard
- From the My Activities section, hover over the activity and the Delete button will appear on the right.
- Click on the Delete button and a confirmation message appears.
- Click Delete.
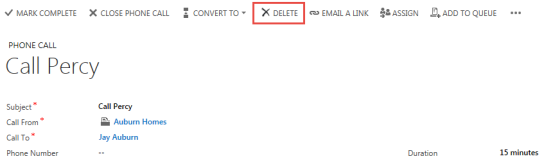
Delete within the Activity
- Open the activity from within an Account, Contact, Lead or Lead.
- On the command bar click Delete.
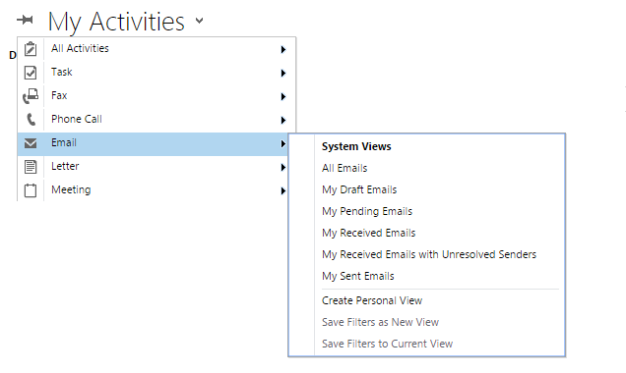
You can view all of the activities assigned to you, or you can view only certain types of activities (for example only tasks, or only phone calls).
- Click the My Activities drop-down list, and then select All Activities, or select the activity type you want (for example, Email).
- Click the right arrow on the drop-down list, and then select the view you want. The views that are available depend on the type of activity.
You can assign an activity to one or multiple users.
- Open the activity.
- On the top command bar click Assign.

- In the Assign to another user or team field, enter the name and click the inline lookup icon. The name appears below.
- Select the name and click Assign.
After you call someone, complete a task, send an email, or go to an appointment, you can mark that Activity as completed in SalesTrack.
- Open the Activity.
- On the command bar click Mark Complete. This activity will no longer appear on your Dashboard view.

|
Only Activities marked as complete will integrate to AMS360. This includes all attachments added to all activities. |
- Click on the Home button to go to your Dashboard work area.
- Click Sales and select Activities.
- On the command bar, click on the type of activity you want to add. Complete all the required information.
- Use the Regarding field to associate it with a Account.
- Click Save or Save & Close.
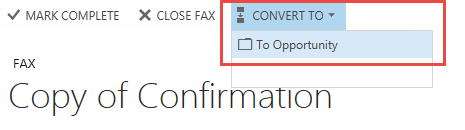
- Open the activity.
- Complete all the required fields and provide as much information as possible.
- On the top command bar click the Convert To drop-down and select To Opportunity. The Convert to Opportunity page appears.
- Ensure all the required fields are correct and checked.
- Click Convert. The New Opportunity page appears. You must complete the required fields and save for this opportunity to appear in your My Open Opportunities section on the Homepage.
|
|
Only an Email activity can be converted into a Lead. |
© 2017 Vertafore