
Annotate a Page
Annotations may be added to images to highlight or draw attention to information in an image. You might use annotations to add an arrow next to items like a person's name or the policy number. You might also add a text annotation to provide detail about work that is needed or that you completed.
You can add annotations to images and PDF files, but you cannot add annotations to certain types of documents in their native format. For example, Microsoft Word documents cannot be annotated.
You can think of annotations as an overlay on an image which becomes a permanent (locked) part of an image. Once annotations, other than a sticky note, are locked (saved), you cannot change them. Before an annotation is saved, you may change its attributes.
Generally, to apply an annotation, you:
- View the image to which you want to add an annotation.
- Click the annotation tool on the Annotation toolbar.
- Drag the pointer over the image or click the image to create the annotation.

|
When preparing to add annotations, you should exit ImageRight Desktop if it is in use also. Agency Platform WorkSmart integration is not designed or intended to be used simultaneously with ImageRight Desktop using the same user account. This would be an unsupported use of the Agency Platform WorkSmart integration. |
You will find the tools that you can use to create annotations on the Annotation toolbar. The brief descriptions below will be helpful in identifying the tools that you need.
- To display the Annotation toolbar, click the Annotation Mode icon
 . The icon is highlighted when the toolbar is visible.
| Click | To |
|---|---|
|
|
Toggle annotation mode. |

|
Show/hide annotations. |

|
Save annotation and rotation of an image. |

|
Add a predefined text stamp. |

|
Type text on an image. |

|
Add a sticky note on an image. |

|
Add an arrow annotation. |

|
Add a highlight to areas of an image. |

|
Rotate an image left. |

|
Rotate an image right. |

|
Delete the selected (unsaved) annotation. Delete a sticky note at any time. |
Below, you will find the steps to add a predefined text stamp annotation to an image and modify its properties. You can easily modify our steps and apply the features shown to meet your needs.
Text stamps must be predefined in ImageRight Enterprise Management Console before they can be used.
- Locate the image to which you would like to add the annotation.
- Click Annotation Mode, , to display the Annotation toolbar.
- Click the Text Stamp annotation, .
- Click the stamp that you want to use.
- Drag the mouse pointer in the area where you want to apply the annotation.
- To save the annotation, do one of the following:
- Click Save .
- Click Annotation Mode,.
- Select and view another image in the file.
- Click Save
Before you save the annotation, you can delete it or change its properties. Click the annotation to select it, as indicated by the sizing handles, and then do one of the following:
- Resize the annotation by dragging one of the sizing handles.
- Drag the annotation to the desired position.
- Click or press Delete to remove the annotation.
Below, you will find the steps to add a typed text annotation to an image and modify its properties. You can easily modify our steps and apply the features shown to meet your needs.
-
Locate the image to which you would like to add the annotation.
-
Click Annotation Mode,
, to display the Annotation toolbar.
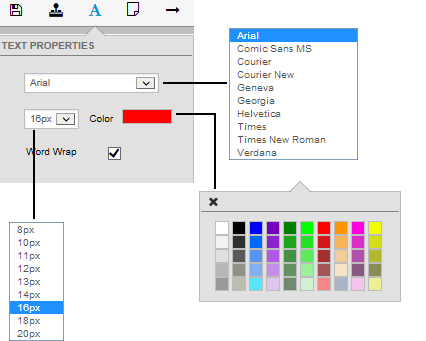
- Click the Typed Text annotation, .
- In Text Properties, select the desired font characteristics.
- Font name
- Size
- Color (font color)
- Word Wrap – long lines of text will wrap in the text box.
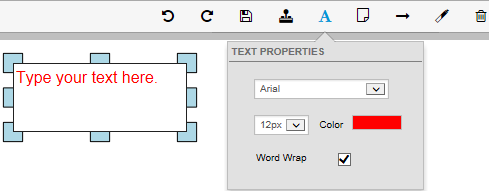
- Drag the mouse pointer in the area where you want to apply the annotation.
- Type the desired text in the text box.
- To save the annotation, do one of the following:
- Click Save, .
- Click Annotation Mode, .
- Select and view another image in the file.
- Click Save,
Before you save the annotation, you can delete it or change its properties. Click the annotation to select it, as indicated by the sizing handles, and then do one of the following:
- Click the text, and then edit the text as needed.
- Resize the annotation by dragging one of the sizing handles.
- Drag the annotation to the desired position.
- Change the font characteristics in the Properties dialog box.
- Click or press Delete to remove the annotation.
Below, you will find the steps to add a sticky note text annotation to an image and modify its properties. You can easily modify our steps and apply the features shown to meet your needs.
Sticky notes are the only annotations that can be moved, changed, or removed after they are added. All other annotations are permanent.
- Locate the image to which you would like to add the annotation.
- Click Annotation Mode,, to display the Annotation toolbar.
- Click the Sticky Note annotation,
 .
.

-
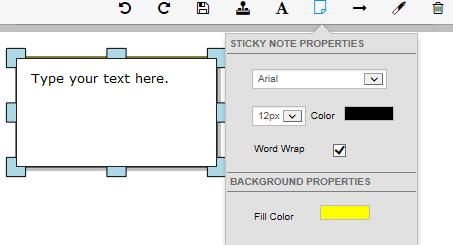
In Sticky Note Properties, select the desired characteristics.
-
Font name
-
Font size
-
Color (font color)
-
Word Wrap – long lines of text will wrap in the text box.
-
Fill Color (background)
-
-
Drag the mouse pointer in the area where you want to apply the annotation.
-
Type the desired text in the text box.
-
To save the annotation, do one of the following:
- Click Save, .
- Click Annotation Mode, .
- Select and view another image in the file.
- Click Save,
You can change the properties and text of a sticky note at any time. You can even remove a note.
- Click Annotation Mode, .
- Click the text, and then edit the text as needed.
- Resize the annotation by dragging one of the sizing handles.
- Drag the annotation to the desired position.
- Change the font characteristics or fill color in the Properties dialog box.
- Click or press Delete to remove the annotation.
Below, you will find the steps to add an arrow annotation to an image and modify its properties. You can easily modify our steps and apply the features shown to meet your needs.
- Locate the image to which you would like to add the annotation.
- Click Annotation Mode, , to display the Annotation toolbar.
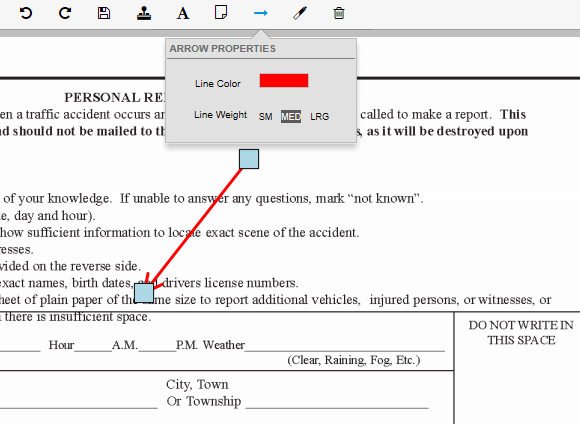
- Click the Arrow annotation, .
- Point at Line Color and select a color as needed.
- Select the Line Weight as needed.

-
Drag the mouse pointer in the area where you want to apply the annotation.
-
To save the annotation, do one of the following:
- Click Save, .
- Click Annotation Mode, .
- Select and view another image in the file.
- Click Save,
Before you save the annotation, you can delete it or change its properties. Click the annotation to select it, as indicated by the sizing handles, and then do one of the following:
- Click the text, and then edit the text as needed.
- Resize the annotation by dragging one of the sizing handles.
- Drag the annotation to the desired position.
- Change the color or other property in the Properties dialog box.
- Click or press Delete to remove the annotation.
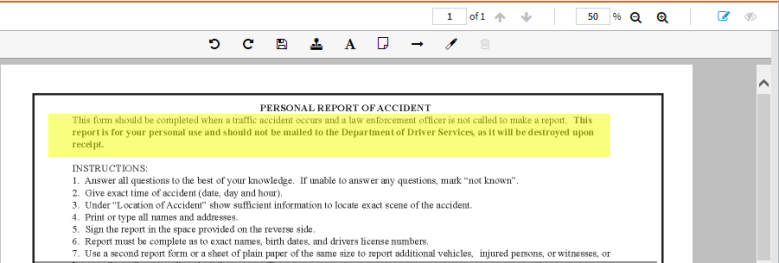
Below, you will find the steps to add a highlight annotation to an image and modify its properties. You can easily modify our steps and apply the features shown to meet your needs.
- Locate the image to which you would like to add the annotation.
- Click Annotation Mode, , to display the Annotation toolbar.
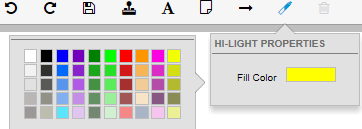
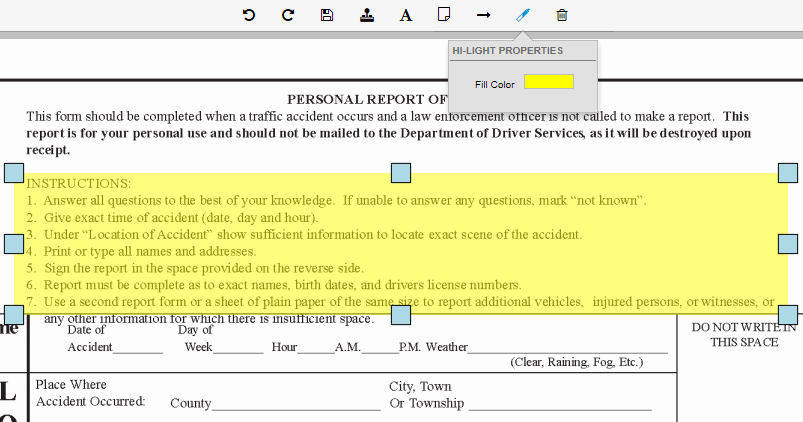
- Click the Highlighter annotation, .
- Point at Fill Color and select a color as needed.
-
Drag the mouse pointer in the area where you want to apply the annotation.
-
To save the annotation, do one of the following:
- Click Save, .
- Click Annotation Mode, .
- Select and view another image in the file.
- Click Save,
Before you save the annotation, you can delete it or change its properties. Click the annotation to select it, as indicated by the sizing handles, and then do one of the following:
- Resize the annotation by dragging one of the sizing handles.
- Drag the annotation to the desired position.
- Change the color in the Properties dialog box.
- Click or press Delete to remove the annotation.
© 2017 Vertafore